Join our mailing list!


Knowledge Base:  
You are here: Knowledge Base > User Guides & Manuals
Basic syringe gun Instructions
Last Updated: 13/12/2011

Manual Syringe Guns 10cc, 30cc and 55cc Sizes - basic instructions


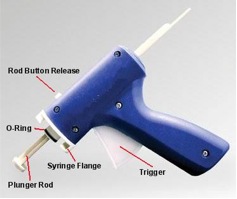
The TS710SG, TS730SG and TS755SG guns are designed for hand dispensing of most gels, pastes, silicones, adhesives and other assembly fluids. Use the guns to make controlled deposits without mess or material waste.


Each gun is supplied with a starter syringe barrel, wiper piston, end cap, tip cap and dispensing tip as well as being available with full component kits. Our products are robust in design and build and are covered by a 12-month manufacturers warranty against fault.


Syringe Gun

Syringe Gun


Basic Instructions

1.  Each gun is supplied with a suitable size plunger rod. One end is flat; the other has a round wall.

2.  Position the plunger rod (flat end) towards the inlet shape at the gun front. Rod pushes in from front. If gun is supplied with
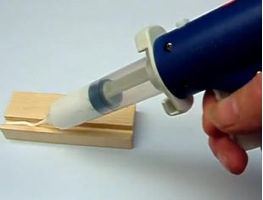
 the rod pre-assembled, move to step 4.
3.  Press the white rod button release on top of the gun and push in the rod. Push rod all the way.
4.  Take a syringe barrel and attach an orange, white or black tip cap seal. 
5.  Fill with adhesive or fluid (approx � of barrel).  Do not overfill to the top of barrel flanges.
6.  Insert a wiper piston and push down to adhesive fill level.  Push on one side of the plastic piston to allow air to escape and push piston to sit on adhesive without any air gaps.
7.  Position syringe barrel over the o-ring on the gun front and twist gently into locked position on the gun flange.

8. Remove syringe tip cap and attach a dispensing tip. Use tapered tips for most fluids including pastes/ gels/ silicones or order precision needle tips for lower viscosity fluids.

9. Squeeze trigger gently whilst the needle tip is touching the substrate.

10.Stop squeezing trigger before lifting needle tip from substrate to prevent oozing or drips.


Keep o-ring and flanges clean. Use light lubricant on o-ring and rod if required. Replace o-ring when damaged. Replacement syringe barrels, pistons, caps, o-rings and dispensing tips are available from us direct from stock.  Please note, 55cc gun can dispense both the 30cc and 55cc syringe barrels.


Please note, never try to insert or remove the plunger rod before pressing and holding down the release button at the top of the gun.  This will damage the gun and invalidate any warranty. Please contact us on +44 (0) 845 652 0058 if you have any questions or please visit our web site.
(Gun colour can vary).


Was this article helpful?

Comments:
 

Related Articles
 > TS250 dispenser training guide and setting up
 > TS250 dispenser maintenance
 > TS1201 Pinch Tube Valve Spares List & Diagram
 > How to replace a pinch tube on the TS1201 series valve
 > TS1201 pinch tube pen valve troubleshooting
 > TS1201 operating instructions for use with a pressure pot
 > TS1201 operating instructions for use with a gravity feed reservoir
 > TS250 and TS255 dispenser standard accessories
 > TS250 and TS255 dispenser spare parts list
 > TS250 and TS350 dispenser I/O Configuration and End of Cycle Switch
 > Instructions 50ml dual side by side epoxy type cartridges
 > Semco Model 388 Semkit Automatic Mixer Datasheet
 > Semco Model 285E Semkit Semi Automatic Mixer Datasheet
 > Semkit and Techkit mixing instructions
 > TS941 Series Spool Valve Dimensions
 > TS941 Series Spool Valve Specifications
 > TS5622-DVD Series Diaphragm Valve Drawing
 > TS5622-DVD Series Diaphragm Valve Dimensions
 > User Guide for ADL810 Analog Dispenser
 > User Guide for 1000T Digital Timed Dispenser
 > I/O Configuration for TS250/TS255/TS350/TS355 Dispensers
 > TS570R Smart Auger Valve Controller
 > TS560R Smart Spray Valve Controller
 > TS550R Smart Dispensing Valve Controller